Saturday, May 6, 2023

Used Laptop for the Hammer-88: USB Problems

     Just an update based on a simple fix for a long-standing problem.  Going way back, I originally had one very good desktop to do everything.  It's 6 or 7 years old now, and still good, but no longer great.  Over the years, some things started conflicting with others.  The usual victim was system audio.  

    This caused the biggest problem with Ableton Live Lite and M-Audio's Hammer-88 keyboard.  Sometimes the audio drivers would quit working randomly.  The  most consistent and annoying villain was when Microsoft did a Windows "update/upgrade."  EVERY SINGLE TIME.  I only know a couple of swear words, but I've used them many many times at Windows updates.

(Warning - Upcoming Rant)
    The problem could sometimes be fixed easily (usually the random occurences.)  Other times (looking at YOU, Microsoft...) it could take days or weeks to get the audio to working reliably.  Sometimes it took so long, another update would come out just days later and we'd start all over again.
    Helpful Hint:  This website provides a link to a trouble-shooter that could fix most of the audio problems in moments:
https://support.microsoft.com/en-us/windows/fix-sound-or-audio-problems-in-windows-73025246-b61c-40fb-671a-2535c7cd56c8
    Yes, I'm aware it's a microsoft link.  That doesn't make me like them any better, since it was nearly always their OS updates that triggered the problem.  Just the same, this is the first thing I try when the audio stops working.  Click the link on the page and allow the app to test for problems.
    The weird thing is, it always reports "no problem found", and starts suggesting random things to try... but actually fixes the issue, at least most of the time.  So I click the "Open Get Help" button, let it do it's thing, then close the window after it reports failure.  And that's usually all it takes.
    Other times, it's as simple as checking "Sounds", going to the PlayBack Tab, and finding that the update has totally played havoc with speaker output assignments.  For some reason, it would reassign a new random output as the default.  Sometimes it would go to a legitimate speaker, like the one built-in to the monitor.  Other times it would choose options that had no output at all.  Re-setting the correct speakers as the default option will typically fix the audio, but sometimes it has to be reassigned as the default with every reboot.  Eventually it sticks, until the next system update.
    The worst ones... the mystery issues with no reliable fix... were the worst. This is part of the reason I quit playing.  It was so consistent, there were so many times I just wanted to 'play the piano' but couldn't, I gave up for a while.
(Rant Over)

A Dedicated Laptop
    In a final attempt to solve the problem, Monique found a used laptop on an Amazon lightning sale.  It's an older HP EliteBook.  Old enough it was originally sold with Windows 7 installed.  It's running Windows 10 now, but that's pushing things.  I don't install extraneous software.  Primarily Ableton, plus CCleaner and Irfanview.  And my favorite browser, Vivaldi. 
    Ableton 10 Live Lite - dedicated to the Hammer 88.
    CCleaner for it's utility toolkit and easy system cleaning. 
    Irfanview for the times I need a screenshot. 
    Vivaldi mainly because I used to use Google Drive to swap files.
    Our working space is tight, so the keyboard is on a wall-mounted shelving system, right beside the door.  It's easy to bump the keyboard while walking past it, and I thought maybe too many impacts caused the issue.


The Ultimate Fix: A USB Hub
    Eventually I realized the problem was the USB port the keyboard was attached to.  The laptop only has 3 USB ports, one to an external audio driver (the Air/Hub, by M-Audio), one to the keyboard, and one for the mouse. Not enough to go around with one having intermittent problems.  We had a 7-port powered hub.  I tried it, but for some reason when the laptop is powered down the hub still provides power to the Hammer 88 and to the mouse.  I didn't want the keyboard to be powered up non-stop all day long.  Seems like that would wear the electronics out faster.
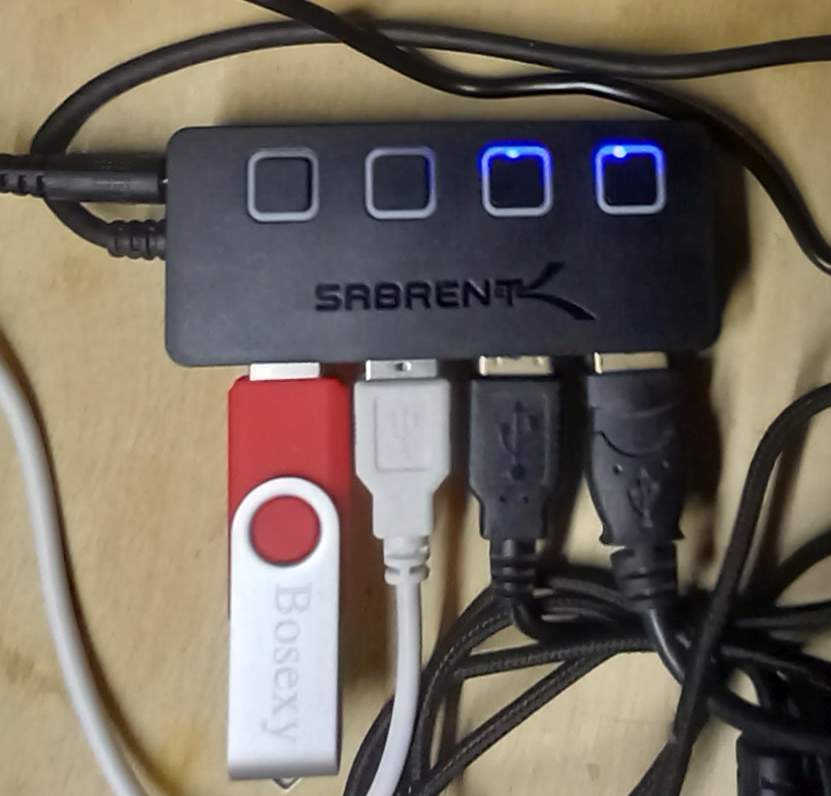
    For about $15.00, we found a great USB hub on Amazon, by Sabrent.  It's powered, has 4 ports, and each port has a dedicated on/off switch, with a light so you know which ones are on.
    Now the keyboard and mouse are connected through the hub.  I also keep a USB memory stick on one port, for trading files between computers.  And the fourth port, just because it was available, provides power to a VCR-to-Computer converter.  Only the ports in use are powered up.  And when the laptop is turned off, I turn off the hub ports as well.  
    Now it works great.  I can play the keyboard reliably, at any time.  And turn the peripherals on/off as needed.  It's amazing when things function like you need them to!!

    With this setup it worked most of the time, but frustratingly there were still days it didn't.  Sometimes on a reboot, the laptop would not communicate with the keyboard.  Occasionally reconnecting the cable between them, but not always.  I started worrying that after all these years of not getting to use it, maybe the keyboard was aging, connections failing, who knows. 

Friday, April 28, 2023

The Technical Side of Grace Notes: Midi and the Missing Sheet Music

     Still celebrating the first brand new posting of my own piano arrangement (Stepping On The Clouds).  Part One of this "Technical Side of Grace Notes" article dealt with how I learn a new song and the process of creating the finished video and blog post.  Today we'll finish with getting the Midi file on Blogger, and acknowledging the missing sheet music.  Then, I'll have a solid reminder against the future and my failing memory.  :^)

    In the previous post, I explained how to save all three elements from Ableton.  The full SET, so I can always re-create the Midi and .wav files.  Just in case.  Plus, of course, the actual Midi and .wav files.  We already applied the .wav file to the video, for a clean audio track with no ambient noise.

    The Midi file I do for it's own sake, for those readers who want it.  Either just to play with Midi on their own setup, or to use Midi as a controllable process for learning how to play my arrangements.  If you downloaded the Midi in order to learn the song, I strongly recommend using Midiano.com as a teaching tool.  It plays my music more "true" than just about anything out there.  It has a visual keyboard you can watch to see the notes as they fall, and the ability to slow down the playback for easier learning.  Plus many other options.

    Not that I have any illusions about my skill level.  There are a ton of musicians on YouTube that put me to shame.  But as my Mom said, there are also plenty of people who are at the perfect level to learn and appreciate what I can offer.  So I don't let all those better players prevent me from putting my two cents in!  

    I'd call my complexity level simple to middling.  There are at least three sites out there that link to my playing as the ideal way to play a specific song.  One of them is even using my sheet music AND my video (it was for Amazing Grace). 
    They were kind enough to give full credit, and to rate the complexity at "Intermediate".  That's higher than I'd expect, and it's very kind of them to share my music.  It validates Mom's advice.

    The real struggle with the Midi wasn't in creating the file, but in getting it onto Blogger in a way that's easy for readers to download.  On the original Grace Notes, I was paying a... large percentage of income... to have a dedicated site to use Wordpress, which I loved.  It had a lot more versatility than Blogger.  But hosting the site got drastically more expensive every single year.  Now I use Google Blogger.  Blogger itself is free.  And a basic Google Workspace is only $12.00 per month.  I still have my custom url, Crewman6.com, and that's a low once-a-year fee.  

    To get to the point, Wordpress offers many options, and you can easily attach just about ANY kind of file for download. Blogger, oddly, only offers Video, Images, or links to other web pages.  Having other filetypes, like Midi, requires a workaround. So here's the gist of it:

    Put the Midi file in your Google Drive, give access to anybody with the link, and copy the link.  Then go to Google Drive Direct Link Generator.  Follow the instructions there to paste your link, then create a direct download link to your Google Drive file.  This is extremely important.  If you try to link to the URL generated by Google Drive, it will open an entirely new webpage, loading it in OVER your blog post.  Then it will attempt to play the midi file in your browser.  Then it will tell you the browser can't play that file, and offer to let you download the file.  THEN you can finally select to download the file.

    That's a huge pain, and the reader winds up on a completely different page, no longer on your post.  Using Google Drive Direct Link Generator is awesome, and free.  It lets you put the modified link on any text or image in your Blogger post, and anybody who clicks the link will be able to simply download the file.  I like choosing where to save downloaded files, so use the "Save As" option.  You might have your downloads default to a single directory for all downloads.  Either is fine.  The point is, the viewer easily downloads the file, without disrupting their reading.  

    Next up, those missing sheet music pages.  On the old Grace Notes blog, I used MidiSheetMusic to both play, and generate sheet music.  It did a great job, but is outdated now and doesn't work with any Midi generated by Ableton.  (Resaving from another Midi player doesn't help either.)  Now I'm in the process of finding another program that can convert Midi to Sheet music, and allow me to make image files of the sheet music.  Originally, those images were saved into .pdf files and uploaded to the blog for anybody that wanted to download.  That's still the plan, but it's been difficult to find software that does exactly what I need.

    I thought I'd solved the problem with MuseScore, which is free to download, converts Midi to sheet music, and allows printing.  Unfortunately, my play-by-ear style seems to confuse Musescore, and when it plays the music back, it completely messes up the order of notes.  Especially if they're played very close together to accentuate the melody.  You know... kind of like a "Grace Note"...  

    Not sure why it struggles with that, because it's sleek and sophisticated software that I like a lot.  Unfortunately, it's not the only one that struggles with my midi.  So far the rule is, if it understands my playing properly, it either offers no sheet music generation, or the function is only available with purchase of the full software.  All the free players that generate printable sheet music have been unable to play the files correctly.

    My favorite, Midiano, plays my stuff perfectly, but as of yet, has no option to create sheet music.  That's not really what Midiano's about, anyway.  My second favorite is a paid software called Notation Musician.  They have a free version, so I KNOW it can play my music perfectly, exactly as intended.  They also generate sheet music.  But the free version does not allow print output.  Yes, I could do screengrabs page by page, but I want to do this the right way.  I'll save up until I can buy the software properly.

    That said, it's $90.00 to purchase, and our budget is very finely balanced to buy food, fuel, pay insurance and taxes.  There's not a lot of leeway for fun things that don't 'earn their keep' monetarily.  So it may take a while to buy Notation Musician.  When I do, I'll go back to any posts as needed and add sheet music downloads.  For now, you're welcome to convert my Midi into sheet music in any way that works for you.  Again, I recommend Midiano.  It's an amazing learning tool, and one of the few players that interprets my playing exactly as intended.

And that's where I'm at, in terms of continuing on Grace Notes.  The last two 'technical' posts were intended to act as memory storage, in case I forget how to do these steps, but I published them just in case any of it might be useful to someone else.  If anybody other than my wife or my mom read these last two posts in their entirety, I'll be totally amazed.  :^D


Wednesday, April 26, 2023

The Technical Side of Grace Notes: Creating the Video and Sharing the Midi Files

     Yesterday marked a huge milestone here.  I finally posted my first brand new page of my own arrangement on piano, with a downloadable midi file of the piano arrangement.  It's been months in the process, learning and relearning all the associated elements. Writing this post is both a celebration... and my crib notes on the general process, in case I forget how to do it all again.  :^)

    I use M-Audio's Hammer 88 to play the songs.  I'm a strictly 'play-it-by-ear' type, so there's no music notation, no hours scribbling my music on notes.  Just sounding out different ways of playing, trying alternatives, and bit by bit designing an arrangement that appeals.  Once the idea is in my head, the hard part is memorizing that arrangement, and practicing until I can play the song (nearly) perfectly.  

    I'm in my 60's, and Covid really messed up my focus and comprehension.  It literally took 3 months to be ready to record.  Then stage fright kicks in.  Hours of playing/recording on Sunday.  More hours on Monday.  Tuesday I sat down, did a practice run-through, and the second attempt was as close to perfect as I'll probably ever get.  So that's the video you see.  (The song in this case is "Stepping On The Clouds.")

   Ableton Live Lite 10 came free with the Hammer 88.  So that's how I play and record the music.  Nothing fancy.  Once Ableton was installed and working, and a few technical set-up issues resolved, it was ready.  To record, I click the round "Record" button, start playing.  When I make a mistake, click "Stop", then "Play", then "Stop".  From trial and error, this activates a blue bar on the midi recording track, which I can then click to make Ableton's notation window pop open.  Click anywhere on the notation (inside the window that just popped up).  Select All (hold down CTRL and type "A".)

    Then I hit the DEL key, and for good measure, also hit the Backspace key.  Now it's a clean slate again.  Click the "Record" button again, and start playing.  Once the whole song is recorded satisfactorily, stop the recording, open the notation window and select All again.  
        {Without selecting ALL, the EXPORT features stay grayed out and don't activate.}

Then, under the FILE dropdown menu, first save the entire process as an Ableton Set (.als file).  Next, still on the File Menu, select EXPORT Midi, and save the midi version of the song.  Lastly, STILL on the File Menu, select EXPORT Audio.  I like to save the file in a ".wav" file format.  Mp3 is more popular, but Wav plays back at a constant speed.  It's not compressed so you can reliably count on the bitrate being stable.  I set it at 44000, 32-bit, and select "Normalize."  It's best if you first set your audio levels to not go over 0 decibels.  If the audio levels go into the red zone, it's set too loud.

    If it's time to record the video as well, I like to start recording, and keep playing even when I make mistakes and have to start over. (Tripod tip: Make sure you're pointing at the piano and frame the image as nicely as you can.  Don't forget to remove unsightly elements like the trash can under the keyboard...)
So, don't stop recording the video.  Keep recording nonstop, through every attempt.  There's a clear visual cue because every restart, the Ableton track needs to be stopped and reset before starting to play again.  When a good recording is achieved, upload the video to your computer.  To find the beginning in-point when editing, start at the end of the video, and scrub backwards until you come to the starting point of your perfect rendition.  Delete all the 'bad' footage in front of that, trim the end a bit if needed, to get your perfect video ready for audio.

    I use HitFilm Express to edit.  It's a free video editor, does a good job, and was easy to learn the bare minimum to create these videos.  Having already imported the video and trimmed it to just the 'good' part, now IMPORT the .wav file.  Drag it to the track just underneath the video.  You should see the video track, including the audio that recorded on the video track, PLUS the .wav audio file you just dragged under the video.

    Make sure both audio tracks are active.  Play the video, and see how close the two audio tracks are to playing in sync.  Make note of how close, which one starts first, then DRAG the .wav left or right to align with the video's audio track.  It's like lip syncing.  You may have to expand the visible track range, to give finer control over how much you move left or right.

    Do this until the Video audio track and the .wav audio are perfectly matching.  Then UNCHECK the video audio.  It's a little speaker symbol on the left.  Play the video again.  Now only the .wav audio track should be playing, and it should be perfectly synced with the fingers moving as they play the piano.
NOTE: if the .wav needs to move farther left than the video track will allow, select all and drag everything to the right to give yourself a bit of working room.

    Once the video and .wav are synced and the original video audio turned off, trim the ends again if needed. If both tracks aren't fully left-justified to the 0:00 starting point, select All and drag them to the 0:00 time marker.  Export the video as an mp4 file on your hard drive, and upload the video to YouTube.  On Blogger, it's easy to click the video button and select your YouTube video for insertion on the blog post.

I treat the audio this way to clean the original video-recorded audio.  Audio recorded directly in your video (I use my cell phone) is fuzzy, and picks up all the ambient noise.  Dogs barking, phones ringing, people talking... the .wav created from Ableton is crisp, clear, and clean of ambient noise.  It's like you recorded in a studio, with proper microphones.

This is a good stopping point.  I'll finish up in the next post.  We'll take a look at getting Midi onto Blogger in a way that's easily downloadable.

Recent Posts